Showing posts with label Photo Asylum 101. Show all posts

Monday, October 13, 2014

Wow! The Lady In Red! You're Perfect! Or...Are You?


 "Oh, Cordelia Brown, what make your head so red?" ~ Harry Belafonte


Like many photographers, my heart sometimes skips a beat when I see an attractive ginger. Man or woman, a handsome, pretty or even interesting-looking person sporting a shock of red hair is fairly unique, at least when it comes to our portfolios.

It's tempting to approach someone right off the bat when we see the hair. If you have any skill at all as a shooter, you figure it's a can't miss. A styling element that will automatically make your image jump off the page.

And maybe you'll be right.

Still, even those of us who are experienced at critically looking at people of every conceivable color, shape, and size (to the point of being our own casting agents) can be fooled by a single strong visual or wardrobe element, and it's often hard to separate the feature that may wow you in person from the way someone will actually appear modeling in a photo.

I know because it's happened. And when it does, and that special someone you swore was perfect when you met them just doesn't look right on your monitor screen, you can only shake your head and wonder what went wrong...

It's a question of learning to really look at a person critically and differentiating between street attractiveness, which many people have (regardless of how photogenic they are), and strong visual features that will come across in a wonderful way when you throw some light on them and the shutter clicks.


Ad photo for kromamakeup.com. Model: Katie. Makeup by Lee Tillett.
Red hair and beautiful face provided by nature.
So, what is one to do? Obviously, there is never a guarantee that someone you meet in person is going to look amazing or be great as a model at a photo shoot. But, you can put the odds more in your favor before you approach people, and that's what my advice here is all about.

Knowing that a person's hair frames their face, it also becomes clear that beautiful hair or a great cut, or in this case hair color can mask subtle or sometimes even major flaws in that face. So, just as casting agents and photographers often want to see potential models with little or no makeup and their hair pulled back away from their face (something that's not at all very practical when you meet someone on the street), I always try to imagine what someone I'm considering casting would look like with a different color hair.

Now, maybe this sounds obvious. Maybe it sounds odd. No matter. It works for me, and by works, I mean it helps me sift through folks that might have really nice or cool or red hair, but otherwise are nothing special when it comes to sticking them in front of the camera. And in my case, one nice feature is usually not enough for me to get involved with them as potential models.

Obviously, you're free to try to style and pose and shoot whomever you want for whatever reason you want. My point is, women with red hair or more importantly, those who change their hair color or appearance to get noticed sometimes get your attention using a bit of smoke and mirrors and for the wrong reasons.

In my experience, it always pays to take a moment and try to imagine someone without the feature that attracted you to them in the first place, and figure out if all the other stuff is strong as well.

You'd be surprised how often it's not...

Monday, September 23, 2013

Photo Asylum 101: Five Types Of Weather. If You Don't Like The Shooting Conditions In Florida, Just Wait A Few Minutes...

"If you don't like the weather in New England, just wait a few minutes..."  

~Mark Twain


Obviously, my post title today playfully paraphrases the famous humorist, as I believe his quote most definitely applies to the Sunshine State as well.

I have never believed that there is a single perfect type of weather for outdoor photography. That's a myth that tends to be passed around more by beginners and hobbyists than professionals. I love all kinds of weather, have shot in all kinds of weather, and have learned that all kinds of weather have their advantages and challenges, and all can be "perfect" for what I shoot most: fashion and portrait.

From an artistic standpoint, I break down the weather for my outdoor shoots into five basic types:
 
full sun - partly cloudy - partly sunny - overcast - rain
 
Yeah, I know, it doesn't take a genius to figure this out. In fact, I seriously doubt I'm telling you anything you do not already know. Still, sometimes one needs to explain useful things by first being a master of the obvious. I like starting points that everyone can relate to.

My real message is this: to better your craft, you need to try to understand how photographic elements such as light, shadows, contrast, brightness range, color, tonality, and detail are determined and affected by the various types of weather.

As far as I'm concerned, there are two major factors when dealing with the weather. One is in the previsualization, or planning stage of a shoot. I have many different photo ideas that are particularly suited to specific types of weather and outdoor lighting. Even when I use a flash on location, I still consider the general scene illumination from the sun and sky when I figure out how to set up a shot.

The second factor, and this is probably a much more needed skill for a shooter, is to understand how to change set ups and technique at the drop of a hat when weather conditions are different or change quickly from what you had originally planned. You shouldn't just have a Plan B, but also a C, D, and E, depending on what you encounter and how it evolves.

Not only can you learn to use this to your advantage when you plan the looks and style of your shots, often pairing image ideas to the existing weather conditions on location, but more importantly, you eventually realize you can adapt to weather that is volatile and quickly changing without having a nervous breakdown on the set.  Those of you (like me) who shoot outside in Florida know exactly what I mean.

This confidence of handling whatever big momma nature throws at you becomes much more important if your goal is to shoot commercial work, where budget or time constraints often mean scheduling a reshoot is not an option.

Don't be fooled by those who only define professional based on the style or quality of someone's work. Sometimes, especially in the eyes of a client, the only factor that makes someone "professional" is that they come through with the goods: they deliver a promised product on time without making excuses.

My mantra has always been this: the more bad habits and mistakes you can remove from your shooting, the higher the quality of your work will be. Knowing how to recognize and work in various types of weather almost automatically improves your shooting. It will certainly make you more professional and reliable.

What follows is a mix of images, some of which I planned and waited for a specific type of sky and light, some of which I simply looked at what I was getting at the time, and set up and shot accordingly.

full sun
I actually don't encounter this too often in my neck of the woods. I'm a cloud guy at heart, and very thankful that Florida usually offers a dazzling array of fluffy white in all shapes, sizes, and colors, especially in the summer. Still, from time to time, whoops...there it is. Nothing but clear blue sky. So, I use it, and by that I mean I try to darken my skies a bit to give them a decent level of color saturation. This may mean underexposing a tad, or shooting multiple exposures to do an HDR effect, or burning the image in post. For me, plain blue skies are bad enough, but plain white skies are far worse.

Unless you live in an area with a lot of air pollution, you will always get bright directional light with stark shadows. This graphic style can be used to great effect, with shadow play pretty much determined by the time of day and the angle of the sun.

Plain, cloudless skies may seem boring, but sometimes they add to a scene. In this shot, I intentionally centered the horizon against conventional wisdom to create an almost mirror effect between the sky and the water. The SeaRey aircraft breaks up the symmetry nicely. it also hints at the stunning view a pilot must get flying around on a clear day. Photo for Lake & Sumter Style Magazine.
partly cloudy
Partly cloudy is what most of us will get a lot of the time, depending of course, on the time of year and the time of day. In Florida, I can often do a 360° and find different cloud coverage in different parts of the sky. It's usually not too hard to find a patch of blue that is mostly sunny. Partly cloudy skies have a normal or average feel to them for obvious reasons: not as empty as cloudless, not nearly as exciting as dramatic storm clouds.

I like partly cloudy skies when I'm shooting lifestyle or traditional environmental/outdoor portraits where I don't want the sky to distract too much from the subject in the shot. As you can see from these examples, sometimes pleasant is just right.

Sometimes it's good to be lucky, especially if reshooting is a pain. For this story on Central Florida cowboys, I spent most of the afternoon riding around on a jeep with no real game plan, just taking spontaneous shots of life on a working ranch. Both I and magazine Creative Director Steve Codraro were thrilled that at the end of the day, I captured this "Marlboro Man" portrait of cowboy Coy Mueller that ended up as a cover. Nearly any kind of sky would have sufficed, but I really preferred a late afternoon sun with just a hint of clouds in the background. For once, nature cooperated. Location: Oxford, Florida.

Another good example of the photo gods smiling on me. This cover shot for Lake & Sumter Style Magazine was done far enough ahead of my deadline that I could have reshot if needed. I treated it as a full-blown fashion shoot and I had the luxury of including a rain date if the weather/lighting wasn't right. Fortunately, it was. Everything was exactly as I had visualized it when I first planned the shot. A few small wisps of colorful clouds was all I wanted to break up the lazy sky. A ton of large, highly dramatic, ginormous storm clouds in the background would have distracted visually from our beautiful model.  Model: Gloriann Brogden. Hair: Ryan Bogard. MUA: Kristin Moulton. Creative Director: Steve Codraro. Location: Mount Dora, Florida.
partly sunny
Partly sunny, or mostly cloudy (if you like to play with semantics) is also very typical in Florida in the summer. In my book, that doesn't mean there is no direct sunlight or brightness in the sky, it simply means there are a lot of clouds out there. And depending on the wind, they might be moving all over the place, including covering all or part of the sun, just not for very long. So a lot of times this becomes a game. I meter often, and prepare to change my camera settings to match the light. I'm speaking, of course, about shooting on manual, which I almost always do. If you use a priority mode, your life may be a bit easier.

Still, quickness has its virtues (as does patience) to get the shot to look the way you want or planned. I tend to be stubborn that way. If I picture specular light in my mind, I want direct illumination. If I'm thinking diffused, I'll wait for the light to get softer. Hopefully, we all find a way of working that suits our style and partly sunny skies has a little something for everyone.

Partly sunny mean a lot of clouds, which are often unpredictable. As the sun peeks in and out, your exposure changes, and that can be a challenge. Frequent metering is a must. Here I simply go with the flow, shooting model Robert Pate in business attire using the emerging sun as a giant key light. I take advantage of the multiple clouds and add them as elements in the window reflection. Fashion test. Location: downtown Orlando.

overcast
Overcast can mean a lot of things. Again, semantics. What I mean are flat gray cloudy skies that remove the blue sky and direct sunlight from the equation. This is not the same as a white sky caused by overexposing the scene on a bright, sunny day. On overcast days, your subjects will be bathed in a beautiful soft light, contrast will also be soft, colors can actually be vivid, and most importantly, image details will be at a maximum, as the brightness range will be compressed.

Where I live, you cannot depend on this type of sky. Some days it is just there. With that in mind, I always have a plan or idea to setup and shoot when I know there will be no hard shadows. Often it doesn't matter, but there are times when that style is much more emotional, melancholy, or even romantic. I may use very weather-specific wardrobe or props to take advantage of the low contrast and increase in image detail.

Completely overcast skies make it a whole new ball game. Think of the sky as a huge soft box overhead adding a massive diffused light to your scene. That can be amazing if it's what you want. Now, I was going to shoot this idea no matter what the weather, as it was our only chance to work with a monstrous Chinese dragon, but when I realized there would be no direct sun, I decided on a colder and more moody vibe to the photo. The low shooting angle gave it scale, and the soft shadows meant the composition and muted colors would dominate the image. Fashion test. Model: Lindsey Palmer, Elite Atlanta. Hair: Lori Jurgensen. MUA: Sophie Loock. Location: Splendid China, Florida.
rain
I'm going to lump rain and heavy dramatic clouds together as they are often both there at the same time. As many of you have discovered, it only takes the blink of an eye to go from a majestic backdrop for your scene to a torrential downpour that threatens to ruin everything, including expensive equipment.

I won't address actually shooting in heavy rain, as up to this point in my career, I can't really remember ever doing that. For anything that involves a lot of time and work on styling, hair, and makeup, when the rains come, I call timeout and we wait. Or move indoors to shoot. Or reschedule. 

Don't get me wrong. I love the rain. As a person. Love rainy days, especially when I lived by the ocean. Love being out in the rain. It just doesn't seem to mix with my photography, though. Maybe as I get further into filmmaking, I'll decide to shoot rain scenes, you know, for the drama and emotion. Until then...

Still, a few drops never killed anyone, and many times (again depending on the wind) a light sprinkle will come and go as you shoot. And come and go. And...well, you get the idea. 

If you find yourself in these kinds of conditions and situations, you should really develop a sort of fire drill that gets your crew (and model and wardrobe) in and out of the moisture as quickly as possible. You also should have a game plan if you decide you want to work in a light rain, making sure everyone knows how to keep the gear and talent as dry as possible. Time is money, and wasted time is a photographer's enemy. A little forethought and talking to those working with you on a shoot ahead of time goes a long way. It may make the difference between a complete washout (pun intended) where nothing is accomplished, or ultimately being productive.

Don't be fooled by the glint of sunshine sneaking through in this behind-the-scenes photo. This late afternoon in Central Florida was almost completely cloudy. So, not only were we running out of daylight, but guess what? It started raining as we tried to work! A photographer's nightmare. Harpist Nici Haerter was not only extremely professional, but actually refused to take her expensive, beautifully carved wooden instrument out of the light rain because she knew we needed to get the shot! As you can see, she decided to cover it with a towel until I was ready to shoot. Photo for Pulse Magazine. Hair: Ryan Bogard. Location: Eustis, Florida.
So, you see what I did? I started off with a handful of mundane comments you all figured you knew all about. Then, as I added details and situations and all kinds of good stuff you need to consider to create really strong photos, hopefully I made you realize things are often not as simply as they seem, and circumstances can change in an instant. You need to learn to be ready, and adapt.

Trust me, all it takes is screwing up even one commercial or personal shoot because of a weather condition you didn't even consider, and you'll find you'll start taking something the average person takes for granted much more seriously. I hope I helped...

Saturday, September 21, 2013

Look Ma! No photos! What the???

As I take a quick look back at some of my blog posts, I can't help but notice that a whole slew of them are simply written themes or ideas without any accompanying images. Obviously, this was not planned, and I know a photographer's blog should be very visual, but there are several good reasons for this.

The main one is time. Some of the ideas I've had for posts were just short thoughts or announcements that I wanted to post immediately due to their time-sensitive nature.  Not only did they not especially need photos to go with them, but (at least for me) editing images to add to a post is time-consuming.

Because of this, it seems I've been putting off many of my more extensive and interesting ideas and tutorials because I haven't taken the time to arrange and edit the many photo examples I need to illustrate what I'm trying to say or get across.

So, I guess what I'm trying to say is I will make it a priority to start posting ideas and topics that include a variety of pretty cool images to clearly show what I'm saying.

After all, isn't that really whatchu whatchu whatchu want???

Saturday, July 30, 2011

Photo Asylum 101: Get That Model Release: In The Photo!

Hopefully, if you're a commercial shooter, or publish your work in any way, shape, or form, you know full well the importance and advantages of having a signed model release from your subject. I'm not going to get into all that today. There are plenty of online resources to help you with releases, including this basic primer from ASMP.

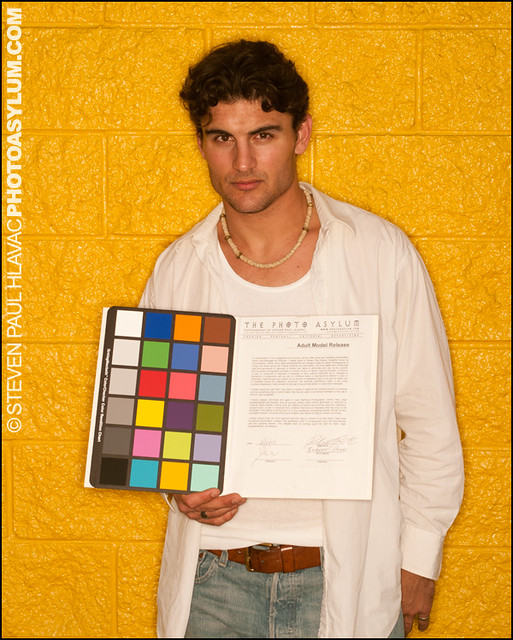
What I would like to do instead, is suggest a good habit to get into when you shoot: snapping a frame or two of your model actually holding the signed release.

Now, every photographer will eventually figure out the way they like to work, but I almost always prefer to have my models sign their releases before we begin shooting. I'm easy-going, my sets are generally relaxed and fun, and most importantly, I have a laptop set up at some point to proof images. My point is there is a fairly high level of trust throughout the whole process, and the majority of models agree to sign without actually knowing precisely how they will be photographed.

One day it occurred to me that photographing the model actually holding the signed release would make a nice, convenient insurance policy, if you will. I have no idea of the legality of the photo should the original document become lost, but having the image right in the same folder as the rest of the shoot does a lot to alleviate any confusion or misunderstandings down the road. It also makes a very good reference file to send along to clients or publications that require documented releases of your models.

flickr-blog-pate-release
Model Robert Pate wouldn't dare deny signing his release as long as I have this!

As you can see, it takes very little effort to find a small piece of foamcore or cardboard (heck, even a small reflector) and attach the release. I like to combine it with my Macbeth Color Checker reference grid, and get both of these mundane tasks out of the way as quickly as possible, so I can focus my energy on the actual shoot.

On the rare occasion there is some hesitation from a model to sign off ahead of time, I simply do all of this at the end of the shoot.

So that's it. Sure, another step to remember to add to a seemingly endless list of steps, but a habit that, once you get into it, will help you be more organized and appear more professional in the long run.

All photos ©Steven Paul Hlavac.

Sunday, July 17, 2011

Photo Asylum 101: Symmetry Is Not A Four Letter Word.

Photographic composition can be a rather intimidating subject, at least when you're trying to learn to separate right from wrong, so you can get better at your craft. It's possible to find an almost unlimited amount of advice and opinions on what the rules of composing your pictures should be. And then when you consider that on any given occasion, most of those rules can be interpreted, stretched, broken, or simply ignored, the whole process can overwhelm the inexperienced photographer in a hurry.

What gets me are those that are rigid in their "rules". They try to make you think you need to conform to some sort of ancient code of honor carved in stone, and if you dare stray from it, your work will suffer immeasurably.

I, on the other hand, to quote Pirates Of The Caribbean --figured they were more actual guidelines-- and have always felt a bit of flexibility is in order. My shooting technique is relatively traditional, but definitely allows room for some "departures" from the norm in the name of style. I have always taught or given advice on photo composition with that philosophy in mind...

A perfect example of this is the idea of symmetry in a photo, which for the sake of this post, will loosely refer to centering a subject in the scene, or having nearly identical visual elements on opposing sides of a scene positioned horizontally in a mirror-like manner. Still with me?

Centering your subject, or having too much symmetry in a scene is often looked down upon by photo purists, as it is in direct violation of the magical Rule of Thirds or Golden Ratio. I'll let you do your own research on those two scared cows.

But I say nonsense! There is no good reason for you to place such arbitrary restrictions on your creativity.

Let's be clear: like many, I strive for an asymmetrical balance in the majority of my work, and if you're familiar with my shooting style, you know I love having visual elements receding into the frame or extending through it at all sorts of interesting angles to create a sense of depth and movement.

People especially are rarely placed in the exact center of my photos...

But IMO centering and shooting symmetrically is not evil, despite what many experts say. It should be considered a welcome change of pace for any photographer. You simply have to have a sense of what you're trying to express with this type of composition, frame your shots thoughtfully and carefully, and try not to be too repetitive.

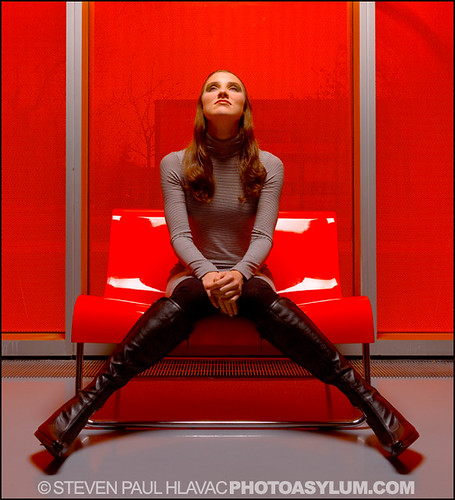
Let me illustrate what I mean by showing some shots from a fashion test with Chicago model Adrianne Michelle (hair/mu: Stacey Lynn). We found a great location at the Illinois Institute of Technology in Chicago where the outside light was filtered through these heavily tinted orange windows (the color you see is redder, and was enhanced in post).


blogger-symmetry1
A symmetrical composition.

Because it was so easy to set up a symmetrical scene by placing the chair between two window frame sections, I decided to start out by posing her in symmetrical poses as well.

And that's one of the best reasons to center your subject and shoot symmetrically: to accentuate that visual effect and make it clear that was your intent. BTW, this is neither here nor there, but if you were observant enough, you may have noticed that's also Adrienne up top in my blog banner. Same shoot. But I digress...

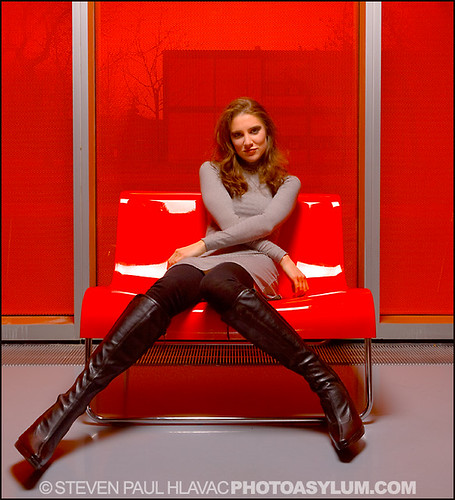
One cool thing you can do with a symmetrical scene is easily create a bit of visual tension and interest by positioning one or more elements or subjects in an asymmetrical position within that scene.


blogger-symmetry2
A mixture of symmetrical and asymmetrical elements.

Above is Adrienne demonstrating exactly that. Same basic camera angle and scene position, which means that most of the shot will still be symmetrical. But she changes her pose, and that makes a huge difference.

BTW, I often go through this routine in many of my shoots. I have a sort of fascination with human symmetry, even if it doesn't make its way into my final images, and many times I'll start the model out in a symmetrical pose, then move on to other things. It's a good visual and posing "warm-up". FWIW, if you're a model, a valuable exercise is to practice moving slowly in a strict symmetrical fashion. It's more challenging than it looks, and may help you out during your shoots.

Now, maybe you don't shoot fashion, or maybe you don't especially want the symmetry of a shot to jump out at the viewer as a style element.

Never fear. Symmetrical compositions work fine in portrait work as well, and they don't have to be rigid. In fact your shots will probably more effective if you soften the rules just a bit.

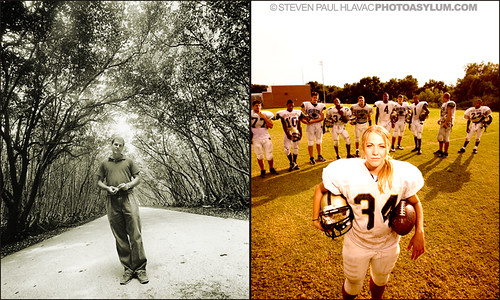
The portraits below illustrates an important guideline for centering your subject: try to use the environment or man-made structures, or even other people in the shot to frame the person.


flickr-blog-portrait-symmetry 
Symmetry can work nicely in portraits as well.

In both of these magazine portraits, neither the pose of the subject nor the background areas are perfectly symmetrical, so the effect is a bit more subtle. I also added a slight horizon tilt on the left that was part of my shooting style at the time. Not everyone's cup of tea, so shoot that sort of thing as you see fit. Oh, and if you're thinking the sky on the right looks a little washed-out, keep in mind the publication placed type there for the cover.

So, never let anyone make you feel guilty about centering your subject, or using a symmetrical composition. Just be sure to do it carefully, and with a sense of purpose, and you'll be fine...

All photos ©Steven Paul Hlavac.

Monday, July 11, 2011

Photo Asylum 101: Holy Crop! Photographers PLEASE Keep Those Model's Hands And Feet inside the frame!

As I look at much of the fashion photography being posted online by younger shooters (and this is mostly self-publishing, not actual magazines), I'm a bit stunned by the number you that don't seem to have a firm grasp on the fine (and I have to assume elusive) art of cropping an image.

As a photographer, you have three opportunities to crop a photo. Once when you compose in the camera. Again when you crop making the print in either a wet darkroom or on a computer. And finally when you present a printed photo by trimming and/or window matting it.

Now, in a sense, composing and cropping an image go hand in hand, as they are essentially the same thing. By cropping, you are altering the composition of your shot. Obviously, the nice thing about cropping is you can do it after the fact, often correcting mistakes or making the composition of a pic stronger after you've had time to look at and think about it.

And much like the art of composition, the full art of cropping is way too encompassing to get into here. So I'll simply deal with one small aspect. One tiny, yet incredibly annoying aspect of cropping fashion photos that I spot with disturbing regularity: cutting off your model's hands at the wrists or feet at the ankles.

Now, let me be clear: you have the right to pose your model, then compose your frame and eventually crop your shot in any way, shape, or form that you see fit. Far be it from me to tell you how to create your own art.

But I see things through the eyes of someone who's shot editorial and advertising work for a lot of publications, and worked with many Editors and Art Directors over the years. To have your work accepted and respected in a larger and much more critical world, you can't just have a free-for-all going on in your photo.

Random doesn't usually work. The way you crop is critical to whether the image is successful or not, and in the commercial world, other people's opinions do count.

Think of it like this: you can drive your car like a madman in your own back yard to your heart's content, but at some point, if you decide to venture out onto the street in the real world, you need to know the "rules of the road", because they do exist.

So, with that in mind, let me start by saying arms and legs at the edge of a frame with either the hands cut off at the wrists or feet cut off at the ankles tends to look really bad.

Really. Bad. Whether you realize it or not...

So, assuming you do not want a full-length shot, where do you crop? Easy. You crop much further up the arms or legs. When you do that, it appears to the eye that those body parts are simply out of the frame. Nothing unusual.

On the other hand, when hands and feet are cropped at the wrists or ankles, it actually appears that those parts are missing, and makes the overall composition look very awkward, or even freakish.

To our left here is a perfect example. Our beautiful model Lucy Marchany (agency: Wihelmina New York) has graciously volunteered to let me slice and dice her lower extremities at various spots in the interest of advancing cropping knowledge for all humanity. What a sport. In return, I promised to buy her new boots. I'm sure you can see the irony...

Now, the shot on the left is properly cropped. A symmetrical composition cut off just above the knees. It looks perfectly natural, what we would call a three-quarter length shot. There is enough of her legs out of the frame that our eyes don't even think about it. They instead concentrate on the part of her that we can see.

The pic on the left is poorly cropped. Lucy's legs lead the viewer's eyes all the way down to where her feet should be. And because of that, you expect to see her feet. When you can't, it seems as though they've been removed. Taken away. Missing. It looks unsettling.

Here is an example of the wrong and right way to crop a model's hands in a shot. Poor Chevonne in the first pic looks like she was involved in some horrible industrial accident that lopped off her left hand. And she's married no less. You can imagine her anguish. Russian beauty Svetlana on the right has her left arm flow smoothly out of the frame, the crop done much higher up the arm and at an angle.

Now, as much as I try to refrain from pointing fingers at any specific individuals with these "lessons", I feel I have to mention a photographer whose online book I viewed recently. Not by name, of course...

They had many shots of extremely attractive models in some very good poses, but almost all of the pics have the poor girls' feet cut off. Yep, you guessed it: at the ankles. It was so odd because it was done so consistently throughout their portfolio. As I've been saying, it would have been much better to either show the models' feet entirely, or crop much higher up on the legs.

What's even worse is many of the shots gave credit to a Wardrobe Stylist, making it quite bizarre, as this stylist was either too lazy or didn't have the resources to pull shoes for these shoots (shoes obviously being one of the most important styling elements of any fashion shoot). Either that, or they simply didn't care that their hard work was eventually cropped out of the photos.

My point is even talented shooters can show they are completely clueless about certain things, and this obvious and easily fixed issue, IMO completely ruined their portfolio. Much like my initial reaction, an Art Director or Photo Editor would cringe viewing the work.


So class, pay careful attention to your in-camera composing, and especially your post-process cropping. Let's either keep those hands and feet safely inside the frame, or crop them out the correct way...

All photos ©Steven Paul Hlavac.

Monday, July 4, 2011

Get Ready For PHOTO ASYLUM 101...

Now, I know for many of you, school is out for the summer, but here at The Photo Asylum, the learning process never stops. Never...

And so, I'll soon be starting a series of blog posts under the common heading of Photo Asylum 101.

The subject matter of these posts will vary widely. Any and all things relating to photography including lighting, shooting, pre and post-production, composition, studio and location gear, presentation, you name it.

Also, various aspects of the fashion business, specifically as they relate to organizing and producing fashion shoots. Styling, casting, location scouting, video, etc.

Sometimes these posts will start with a particular criticism. Something I see being done wrong or poorly. The emphasis will never be on the negativity of the mistakes or the bad habits, but rather my suggestions for perhaps ways of doing things a bit better. Persuade rather than admonish.

Other times these will just be straight-forward, short tutorials, simply explaining a rule, technique, or way I've learned to do something that I want to pass along. Again, a suggestion. Just something for you to consider.

My intention will always be to improve your way of working, and as with most things in life, you are free to embrace or ignore my advice.

So, get ready. There will be a test at the end of the semester...