Saturday, July 30, 2011

Photo Asylum 101: Get That Model Release: In The Photo!

Hopefully, if you're a commercial shooter, or publish your work in any way, shape, or form, you know full well the importance and advantages of having a signed model release from your subject. I'm not going to get into all that today. There are plenty of online resources to help you with releases, including this basic primer from ASMP.

What I would like to do instead, is suggest a good habit to get into when you shoot: snapping a frame or two of your model actually holding the signed release.

Now, every photographer will eventually figure out the way they like to work, but I almost always prefer to have my models sign their releases before we begin shooting. I'm easy-going, my sets are generally relaxed and fun, and most importantly, I have a laptop set up at some point to proof images. My point is there is a fairly high level of trust throughout the whole process, and the majority of models agree to sign without actually knowing precisely how they will be photographed.

One day it occurred to me that photographing the model actually holding the signed release would make a nice, convenient insurance policy, if you will. I have no idea of the legality of the photo should the original document become lost, but having the image right in the same folder as the rest of the shoot does a lot to alleviate any confusion or misunderstandings down the road. It also makes a very good reference file to send along to clients or publications that require documented releases of your models.

flickr-blog-pate-release
Model Robert Pate wouldn't dare deny signing his release as long as I have this!

As you can see, it takes very little effort to find a small piece of foamcore or cardboard (heck, even a small reflector) and attach the release. I like to combine it with my Macbeth Color Checker reference grid, and get both of these mundane tasks out of the way as quickly as possible, so I can focus my energy on the actual shoot.

On the rare occasion there is some hesitation from a model to sign off ahead of time, I simply do all of this at the end of the shoot.

So that's it. Sure, another step to remember to add to a seemingly endless list of steps, but a habit that, once you get into it, will help you be more organized and appear more professional in the long run.

All photos ©Steven Paul Hlavac.

Sunday, July 17, 2011

Photo Asylum 101: Symmetry Is Not A Four Letter Word.

Photographic composition can be a rather intimidating subject, at least when you're trying to learn to separate right from wrong, so you can get better at your craft. It's possible to find an almost unlimited amount of advice and opinions on what the rules of composing your pictures should be. And then when you consider that on any given occasion, most of those rules can be interpreted, stretched, broken, or simply ignored, the whole process can overwhelm the inexperienced photographer in a hurry.

What gets me are those that are rigid in their "rules". They try to make you think you need to conform to some sort of ancient code of honor carved in stone, and if you dare stray from it, your work will suffer immeasurably.

I, on the other hand, to quote Pirates Of The Caribbean --figured they were more actual guidelines-- and have always felt a bit of flexibility is in order. My shooting technique is relatively traditional, but definitely allows room for some "departures" from the norm in the name of style. I have always taught or given advice on photo composition with that philosophy in mind...

A perfect example of this is the idea of symmetry in a photo, which for the sake of this post, will loosely refer to centering a subject in the scene, or having nearly identical visual elements on opposing sides of a scene positioned horizontally in a mirror-like manner. Still with me?

Centering your subject, or having too much symmetry in a scene is often looked down upon by photo purists, as it is in direct violation of the magical Rule of Thirds or Golden Ratio. I'll let you do your own research on those two scared cows.

But I say nonsense! There is no good reason for you to place such arbitrary restrictions on your creativity.

Let's be clear: like many, I strive for an asymmetrical balance in the majority of my work, and if you're familiar with my shooting style, you know I love having visual elements receding into the frame or extending through it at all sorts of interesting angles to create a sense of depth and movement.

People especially are rarely placed in the exact center of my photos...

But IMO centering and shooting symmetrically is not evil, despite what many experts say. It should be considered a welcome change of pace for any photographer. You simply have to have a sense of what you're trying to express with this type of composition, frame your shots thoughtfully and carefully, and try not to be too repetitive.

Let me illustrate what I mean by showing some shots from a fashion test with Chicago model Adrianne Michelle (hair/mu: Stacey Lynn). We found a great location at the Illinois Institute of Technology in Chicago where the outside light was filtered through these heavily tinted orange windows (the color you see is redder, and was enhanced in post).


blogger-symmetry1
A symmetrical composition.

Because it was so easy to set up a symmetrical scene by placing the chair between two window frame sections, I decided to start out by posing her in symmetrical poses as well.

And that's one of the best reasons to center your subject and shoot symmetrically: to accentuate that visual effect and make it clear that was your intent. BTW, this is neither here nor there, but if you were observant enough, you may have noticed that's also Adrienne up top in my blog banner. Same shoot. But I digress...

One cool thing you can do with a symmetrical scene is easily create a bit of visual tension and interest by positioning one or more elements or subjects in an asymmetrical position within that scene.


blogger-symmetry2
A mixture of symmetrical and asymmetrical elements.

Above is Adrienne demonstrating exactly that. Same basic camera angle and scene position, which means that most of the shot will still be symmetrical. But she changes her pose, and that makes a huge difference.

BTW, I often go through this routine in many of my shoots. I have a sort of fascination with human symmetry, even if it doesn't make its way into my final images, and many times I'll start the model out in a symmetrical pose, then move on to other things. It's a good visual and posing "warm-up". FWIW, if you're a model, a valuable exercise is to practice moving slowly in a strict symmetrical fashion. It's more challenging than it looks, and may help you out during your shoots.

Now, maybe you don't shoot fashion, or maybe you don't especially want the symmetry of a shot to jump out at the viewer as a style element.

Never fear. Symmetrical compositions work fine in portrait work as well, and they don't have to be rigid. In fact your shots will probably more effective if you soften the rules just a bit.

The portraits below illustrates an important guideline for centering your subject: try to use the environment or man-made structures, or even other people in the shot to frame the person.


flickr-blog-portrait-symmetry 
Symmetry can work nicely in portraits as well.

In both of these magazine portraits, neither the pose of the subject nor the background areas are perfectly symmetrical, so the effect is a bit more subtle. I also added a slight horizon tilt on the left that was part of my shooting style at the time. Not everyone's cup of tea, so shoot that sort of thing as you see fit. Oh, and if you're thinking the sky on the right looks a little washed-out, keep in mind the publication placed type there for the cover.

So, never let anyone make you feel guilty about centering your subject, or using a symmetrical composition. Just be sure to do it carefully, and with a sense of purpose, and you'll be fine...

All photos ©Steven Paul Hlavac.

Wednesday, July 13, 2011

Summer 2011 Issue Of PULSE MAGAZINE Now Out!

The new issue of PULSE MAGAZINE is now on the street. Pulse, of course, being a nice little glossy covering art, music, writing, dining, and other assorted cultural diversions in the Lake County cities of Mount Dora, Eustis, and Tavares.

As it so happens, I do have ulterior motives for touting the new issue. Inside, my full-page shot accompanies a fun feature by writer Tony Marzano on local legend Dr. Edgar James Banks, a turn-of-the-century archeological adventurer and college lecturer often credited as the inspiration for the Indiana Jones character of Hollywood movie fame.

It was shot at the nearby Eustis Historical Museum, which has an entire room dedicated to Dr. Banks, a re-creation of one of his bedrooms with some assorted personal items and other props from that period.

So, look around, and pick up a copy when you get the chance. For those of you outside the Central Florida distribution area, check out the PULSE MAGAZINE web site.

Monday, July 11, 2011

Photo Asylum 101: Holy Crop! Photographers PLEASE Keep Those Model's Hands And Feet inside the frame!

As I look at much of the fashion photography being posted online by younger shooters (and this is mostly self-publishing, not actual magazines), I'm a bit stunned by the number you that don't seem to have a firm grasp on the fine (and I have to assume elusive) art of cropping an image.

As a photographer, you have three opportunities to crop a photo. Once when you compose in the camera. Again when you crop making the print in either a wet darkroom or on a computer. And finally when you present a printed photo by trimming and/or window matting it.

Now, in a sense, composing and cropping an image go hand in hand, as they are essentially the same thing. By cropping, you are altering the composition of your shot. Obviously, the nice thing about cropping is you can do it after the fact, often correcting mistakes or making the composition of a pic stronger after you've had time to look at and think about it.

And much like the art of composition, the full art of cropping is way too encompassing to get into here. So I'll simply deal with one small aspect. One tiny, yet incredibly annoying aspect of cropping fashion photos that I spot with disturbing regularity: cutting off your model's hands at the wrists or feet at the ankles.

Now, let me be clear: you have the right to pose your model, then compose your frame and eventually crop your shot in any way, shape, or form that you see fit. Far be it from me to tell you how to create your own art.

But I see things through the eyes of someone who's shot editorial and advertising work for a lot of publications, and worked with many Editors and Art Directors over the years. To have your work accepted and respected in a larger and much more critical world, you can't just have a free-for-all going on in your photo.

Random doesn't usually work. The way you crop is critical to whether the image is successful or not, and in the commercial world, other people's opinions do count.

Think of it like this: you can drive your car like a madman in your own back yard to your heart's content, but at some point, if you decide to venture out onto the street in the real world, you need to know the "rules of the road", because they do exist.

So, with that in mind, let me start by saying arms and legs at the edge of a frame with either the hands cut off at the wrists or feet cut off at the ankles tends to look really bad.

Really. Bad. Whether you realize it or not...

So, assuming you do not want a full-length shot, where do you crop? Easy. You crop much further up the arms or legs. When you do that, it appears to the eye that those body parts are simply out of the frame. Nothing unusual.

On the other hand, when hands and feet are cropped at the wrists or ankles, it actually appears that those parts are missing, and makes the overall composition look very awkward, or even freakish.

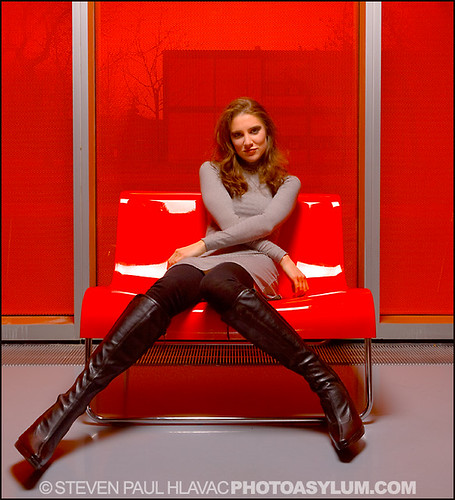
To our left here is a perfect example. Our beautiful model Lucy Marchany (agency: Wihelmina New York) has graciously volunteered to let me slice and dice her lower extremities at various spots in the interest of advancing cropping knowledge for all humanity. What a sport. In return, I promised to buy her new boots. I'm sure you can see the irony...

Now, the shot on the left is properly cropped. A symmetrical composition cut off just above the knees. It looks perfectly natural, what we would call a three-quarter length shot. There is enough of her legs out of the frame that our eyes don't even think about it. They instead concentrate on the part of her that we can see.

The pic on the left is poorly cropped. Lucy's legs lead the viewer's eyes all the way down to where her feet should be. And because of that, you expect to see her feet. When you can't, it seems as though they've been removed. Taken away. Missing. It looks unsettling.

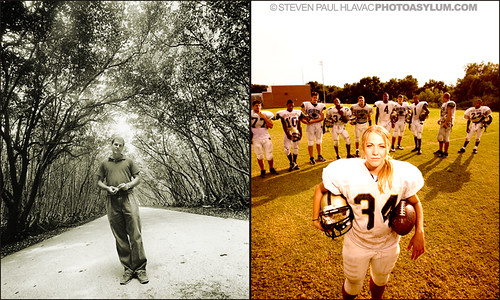
Here is an example of the wrong and right way to crop a model's hands in a shot. Poor Chevonne in the first pic looks like she was involved in some horrible industrial accident that lopped off her left hand. And she's married no less. You can imagine her anguish. Russian beauty Svetlana on the right has her left arm flow smoothly out of the frame, the crop done much higher up the arm and at an angle.

Now, as much as I try to refrain from pointing fingers at any specific individuals with these "lessons", I feel I have to mention a photographer whose online book I viewed recently. Not by name, of course...

They had many shots of extremely attractive models in some very good poses, but almost all of the pics have the poor girls' feet cut off. Yep, you guessed it: at the ankles. It was so odd because it was done so consistently throughout their portfolio. As I've been saying, it would have been much better to either show the models' feet entirely, or crop much higher up on the legs.

What's even worse is many of the shots gave credit to a Wardrobe Stylist, making it quite bizarre, as this stylist was either too lazy or didn't have the resources to pull shoes for these shoots (shoes obviously being one of the most important styling elements of any fashion shoot). Either that, or they simply didn't care that their hard work was eventually cropped out of the photos.

My point is even talented shooters can show they are completely clueless about certain things, and this obvious and easily fixed issue, IMO completely ruined their portfolio. Much like my initial reaction, an Art Director or Photo Editor would cringe viewing the work.


So class, pay careful attention to your in-camera composing, and especially your post-process cropping. Let's either keep those hands and feet safely inside the frame, or crop them out the correct way...

All photos ©Steven Paul Hlavac.

Monday, July 4, 2011

Get Ready For PHOTO ASYLUM 101...

Now, I know for many of you, school is out for the summer, but here at The Photo Asylum, the learning process never stops. Never...

And so, I'll soon be starting a series of blog posts under the common heading of Photo Asylum 101.

The subject matter of these posts will vary widely. Any and all things relating to photography including lighting, shooting, pre and post-production, composition, studio and location gear, presentation, you name it.

Also, various aspects of the fashion business, specifically as they relate to organizing and producing fashion shoots. Styling, casting, location scouting, video, etc.

Sometimes these posts will start with a particular criticism. Something I see being done wrong or poorly. The emphasis will never be on the negativity of the mistakes or the bad habits, but rather my suggestions for perhaps ways of doing things a bit better. Persuade rather than admonish.

Other times these will just be straight-forward, short tutorials, simply explaining a rule, technique, or way I've learned to do something that I want to pass along. Again, a suggestion. Just something for you to consider.

My intention will always be to improve your way of working, and as with most things in life, you are free to embrace or ignore my advice.

So, get ready. There will be a test at the end of the semester...

Friday, July 1, 2011

Fire Up The Works! And Get Great Photos Of Them...

There are certain impressive visual displays in life that I admire and sometimes even marvel at, but never really have the urge to photograph. Rainbows and lightning come to mind. I truly appreciate them, but have little or no interest in capturing them in a photo.

Fireworks also fall into that category. Don't get me wrong. I love a good fireworks show, and have many many wonderful memories of seeing them with friends and family, mostly from when I was little.

It's just that, for me, it's all about witnessing these things as large as life in real-time with real people. I find photos rarely come close to capturing that experience.

But I completely understand folks' desire to get great (or even good) fireworks pictures. The line between classic theme and cliché is sometimes a thin one, and I think fireworks qualify as both.

Still, it can be quite a challenge, and with that in mind, I'd like to point you to a very good guide to making those images memorable from photographyreview.com:

Fireworks Photography Tips

Now, if you follow these guidelines, I think you'll find it's not too terribly difficult. But it may require you to shoot in a much more traditional manner: using a tripod and camera with manually adjustable settings. If you notice my pathetically blurry fireworks pic above, you can plainly see what happens when one tries to use a meager point & shoot (handheld no less) to do the work of a DSLR...

Obviously, in this age of smart phones, many of you will simply use your phone cameras to shoot the fireworks display. Or at least try. I really have no idea what kind of results you will get, but if that's your plan, I wish you the best of luck. Maybe you'll be pleasantly surprised.

Have a great FOURTH everyone!